Step-by-Step Guide: Creating a Storage Account and Adding Blob Container in Azure
Create a container with anonymous read access for containers and blobs

Outline
Step1 - Sign into Azure Portal
Step 2 - Create a Storage Account
Step 2A - Basic Settings
Step 2B - Advanced settings
Step 2C - Networking Settings
Step 2D - Data Protection Settings
Step 2E - Encryption settings
Step 2F - Tags
Step 2G - Validation in progress
Step 2H - Deployment complete
Step 3 - Navigate Storage
Step 4 - Create a Blob Container
Step 5 - Access and Manage
Step 6 _ Upload Files
Step 7 - How to Create a Folder
Step 8 - Copy & paste File URL on a Web Browser
Step 9 - How to Change Tier
Introductory
Do you want to keep a lot of unstructured data on the cloud? Perhaps Azure Blob Storage is the answer you're looking for. Microsoft Azure offers Azure Blob Storage, a scalable, safe, and reasonably priced storage solution. For developers, data scientists, and IT professionals alike, Azure Blob Storage provides an adaptable platform for storing a wide range of media, including logs, videos, and documents. We'll go through the fundamentals of adding a blob container and configuring storage on Azure in this tutorial.
Step 1 -Sign in to the Azure portal: Log in to the Azure portal using your Azure account credentials
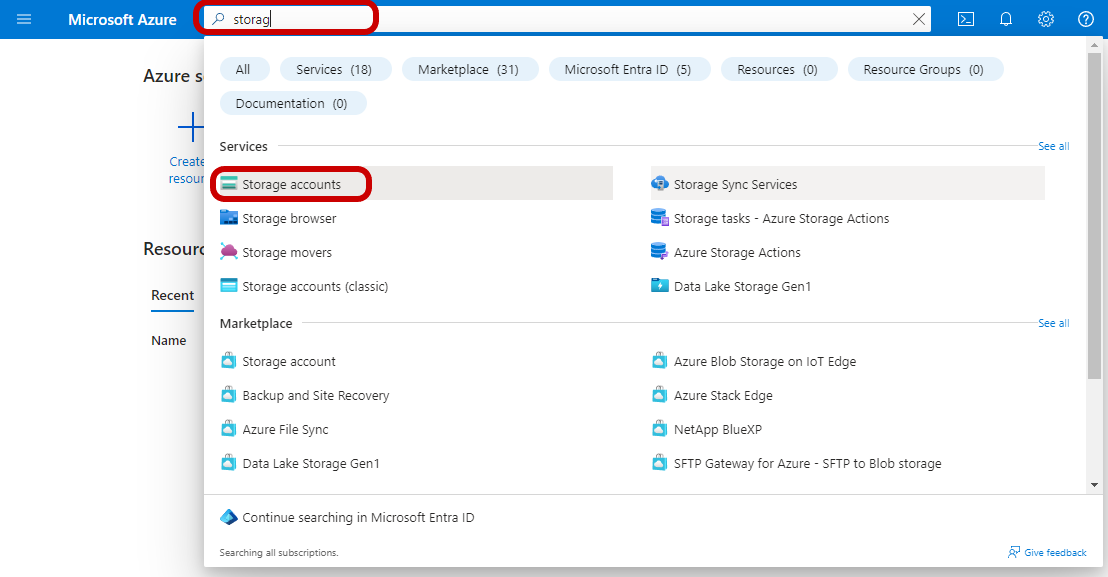
Step 2 - Create a new storage account: Navigate to the Azure Search bar on the dashboard and Search for "Storage account" "Click on" "Storage accounts"
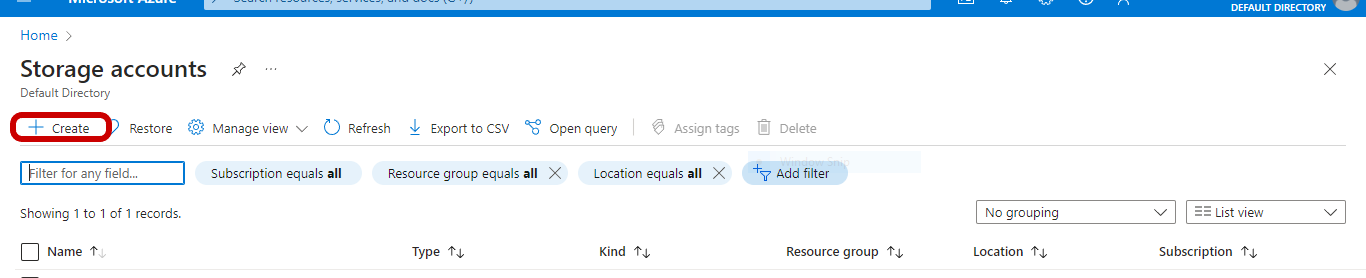
a. Click on the "Create" button to start creating a new storage account
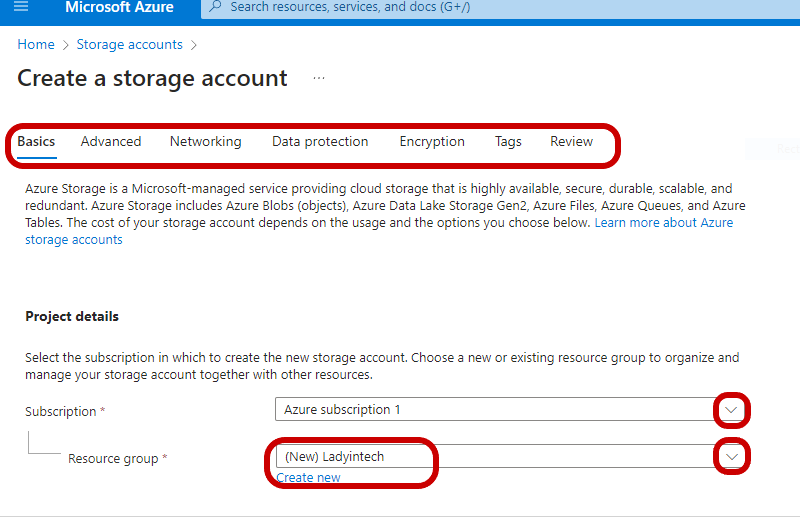
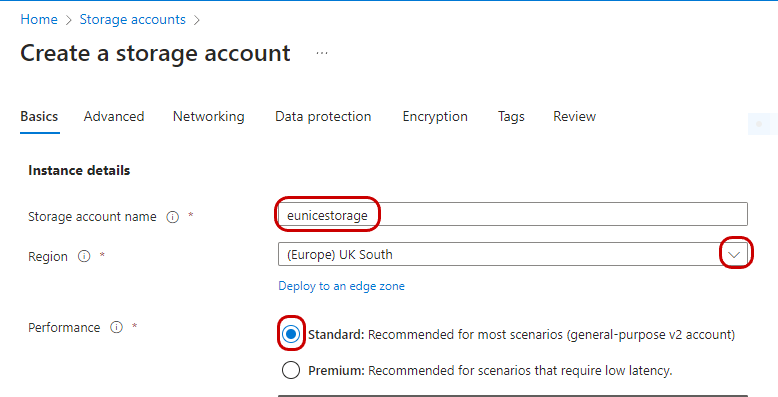
2A. Fill out the necessary information on the settings. Let's begin with Basics setting "Select a" "Subscription" and then "Click" on "Create" to start a new resource group, or "Select" an already-existing resource group
B. Storage account name "Create" "Storage account name", "Select Region" "Uk South ", and Standard Performance is suitable for most workloads that do not require high-performance storage "Check" "Standard"
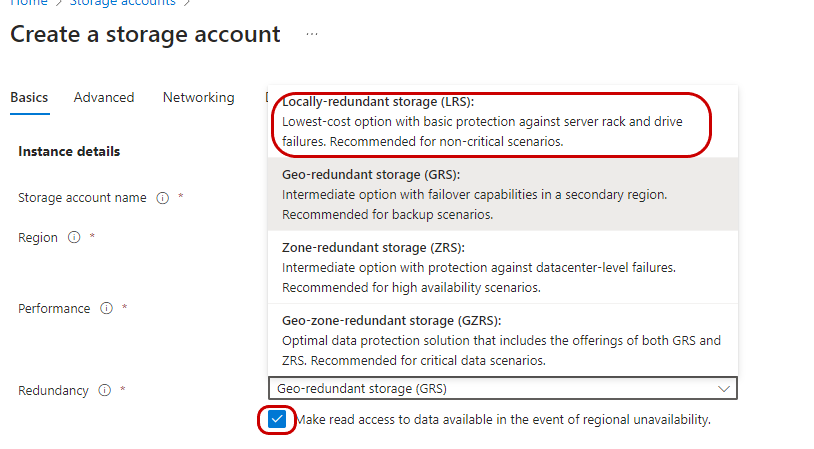
C. Locally redundant storage (LRS) copies your data synchronously three times within a single physical location in the primary region. "Select" "LRS"
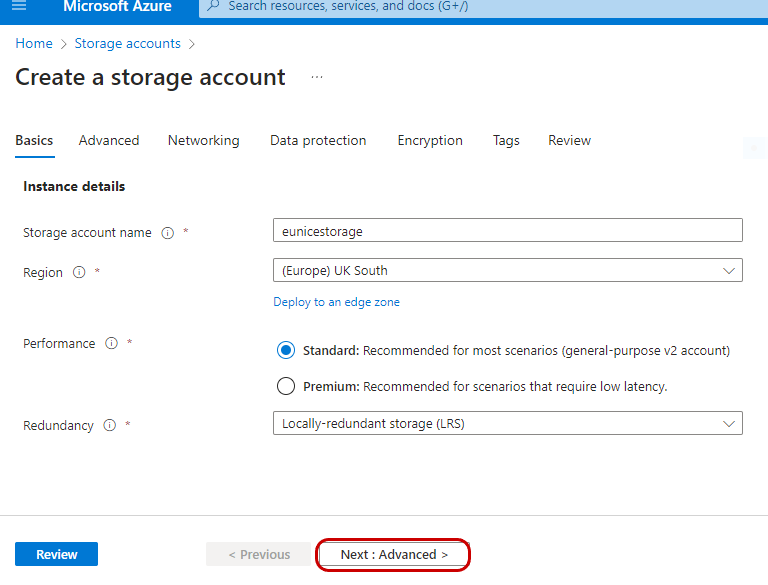
D. "Click on" "Next: Advanced"
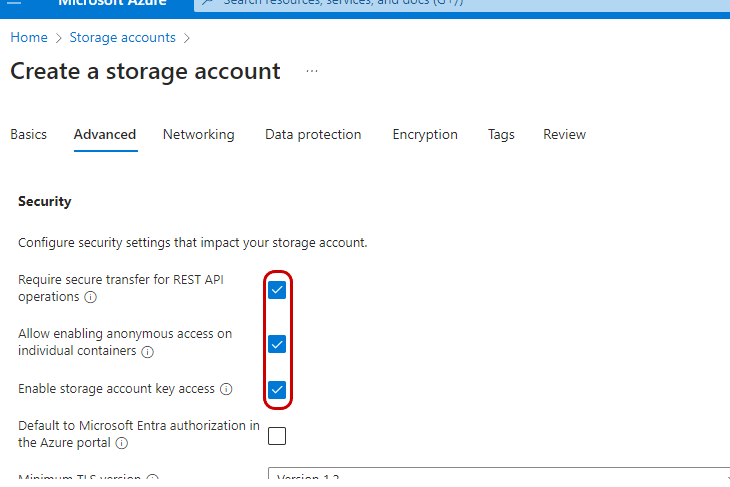
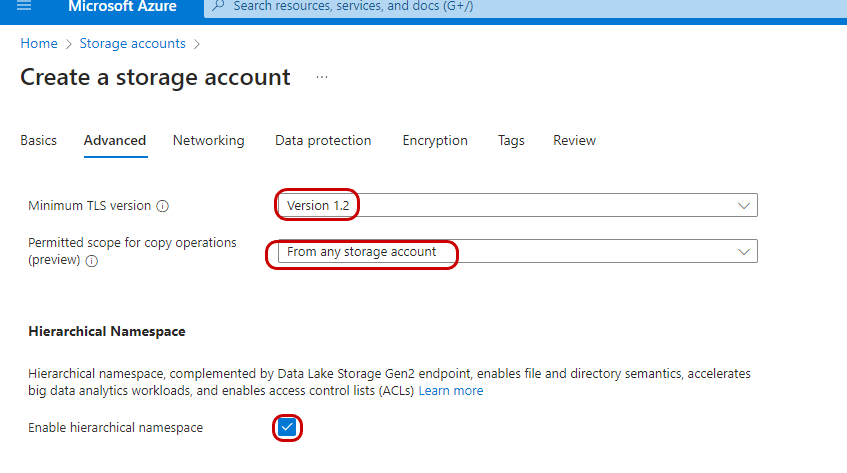
Step 2B - Configure security settings "Check" the highlighted boxes as done below
C. leave as "Default settings" as displayed in the image below
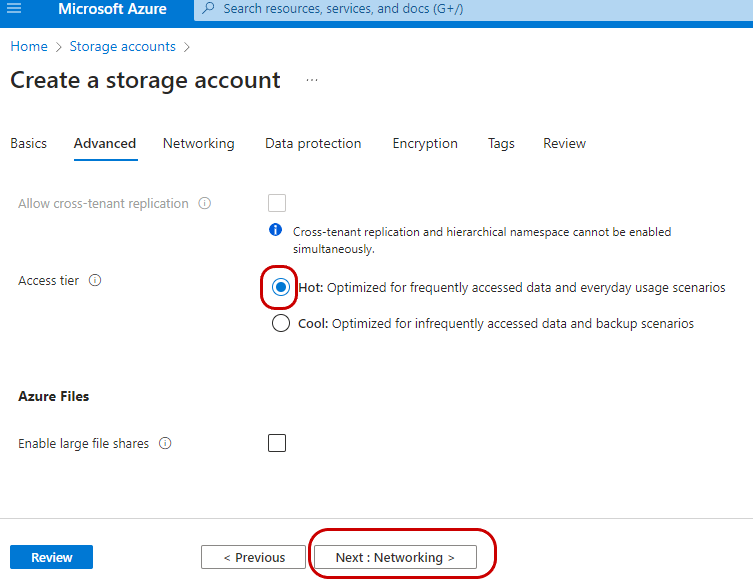
D. Hot tier - An online tier optimized for storing data that is accessed or modified frequently. The hot tier has the highest storage costs, but the lowest access costs. Cool tier - An online tier optimized for storing data that is infrequently accessed or modified. "Select" "Hot" "Click on" "Next: Networking"
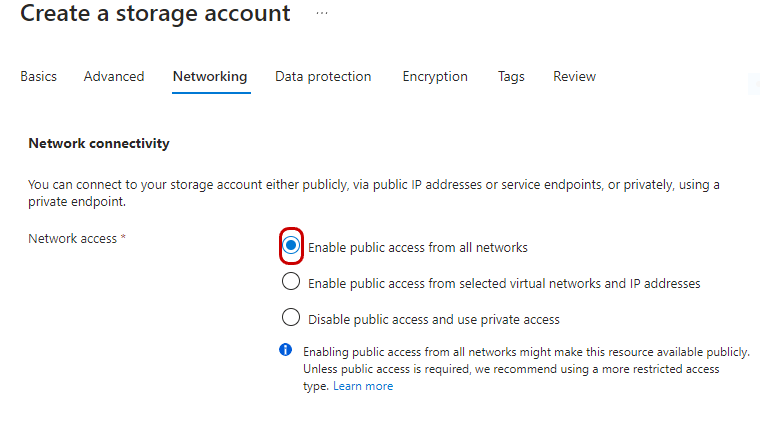
Step 2C - "Check" "Enable public access from all networks"
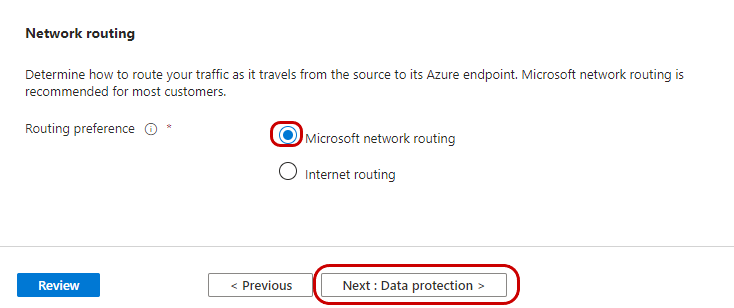
D. "Check" "Microsoft network routing and "Click on" "Next: Data protection"
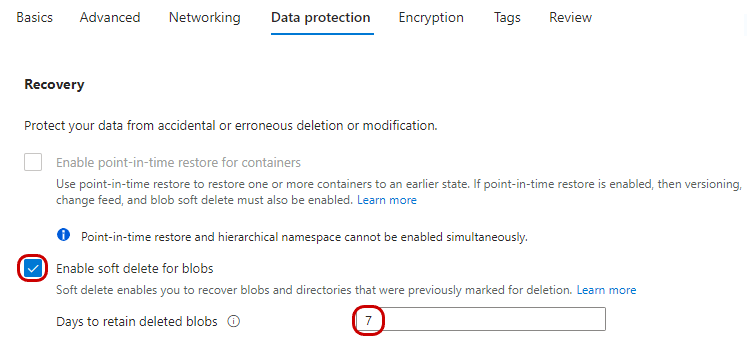
Step 2D -Soft delete protects your data from being accidentally deleted by maintaining the deleted data in the system for a specified period of time "Check box" to "Enable soft delete for blobs" and Add "7 days"
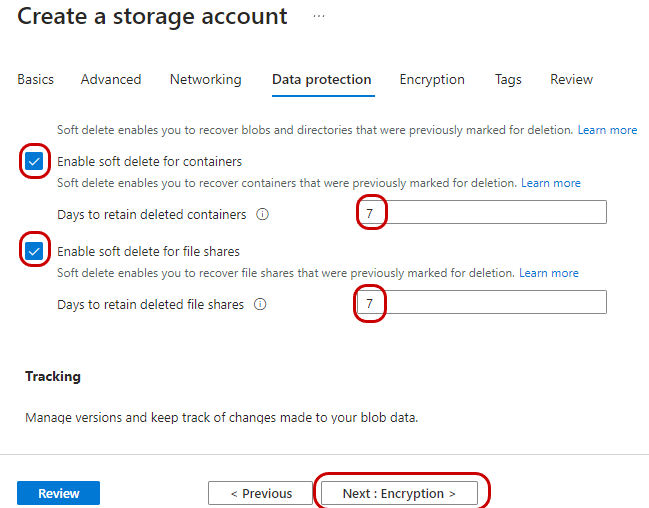
E. "Check box" "Enable soft delete for containers" "Days to Retain" "7" "Check box" "Enable soft delete for file shares" "Days to Retain" "7" "Click on" "Next: Encryption"
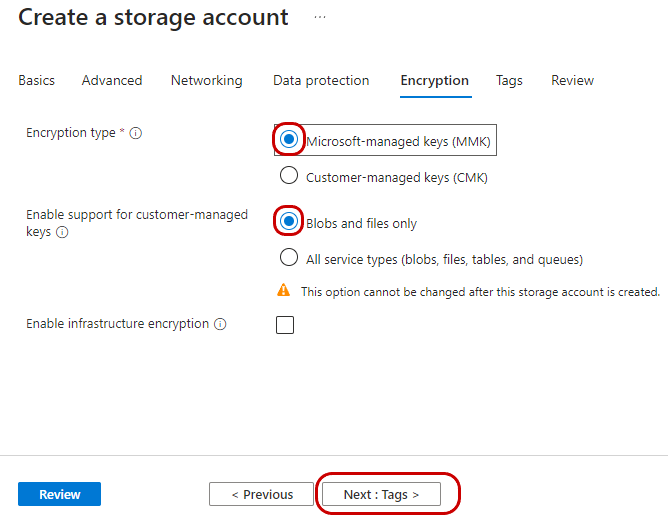
Step 2E - "Check box" "Microsoft-managed keys" "Check box" " Blobs and files only" and "Click on" "Next: Tags"
Step 2F - Always add Tags
You can give metadata labels to Azure resources such as virtual machines, storage accounts, databases, and so on by using tags in Microsoft Azure. Key-value pairs that you define make up tags. They let you do a lot of things, like track expenses, apply access limits, and arrange resources logically. Once you've filled in all the details, review your configuration settings and click on "Create" to deploy the storage account.
"Click on" "Review"
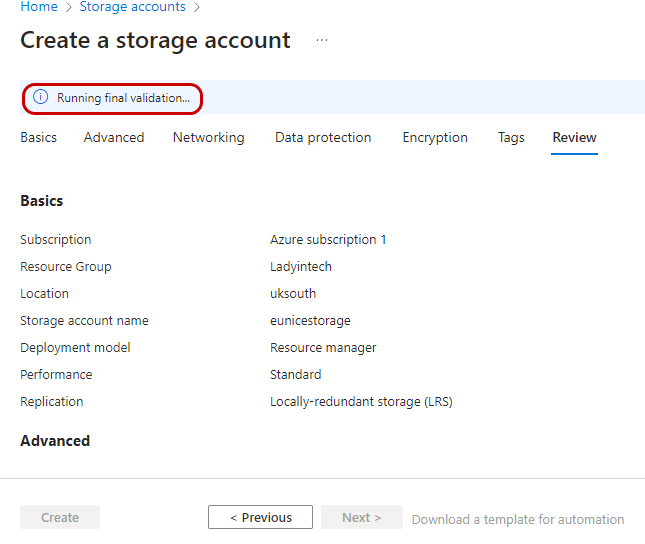
Step 2G - Validation in Progress
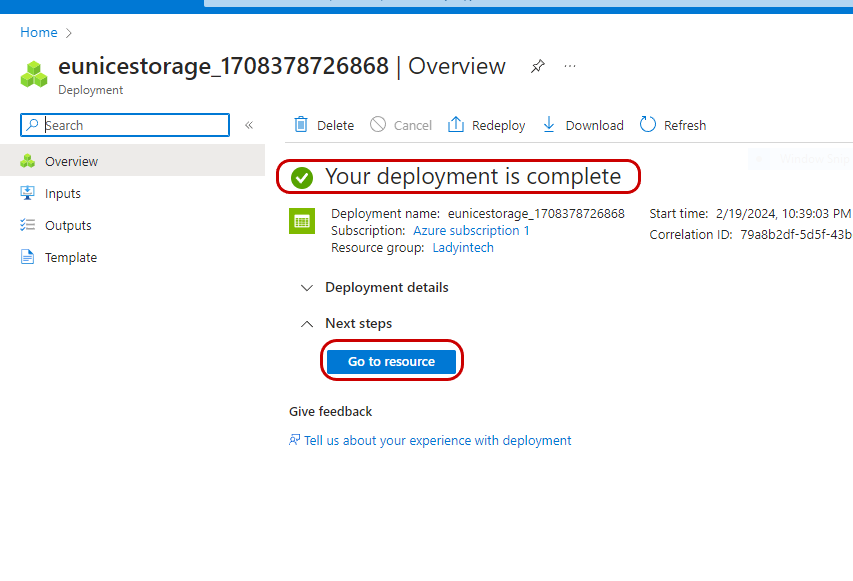
Step 2H - deployment Complete: Once your storage account is deployed, navigate to it from the Azure portal dashboard. "Click on" "Go to resource"
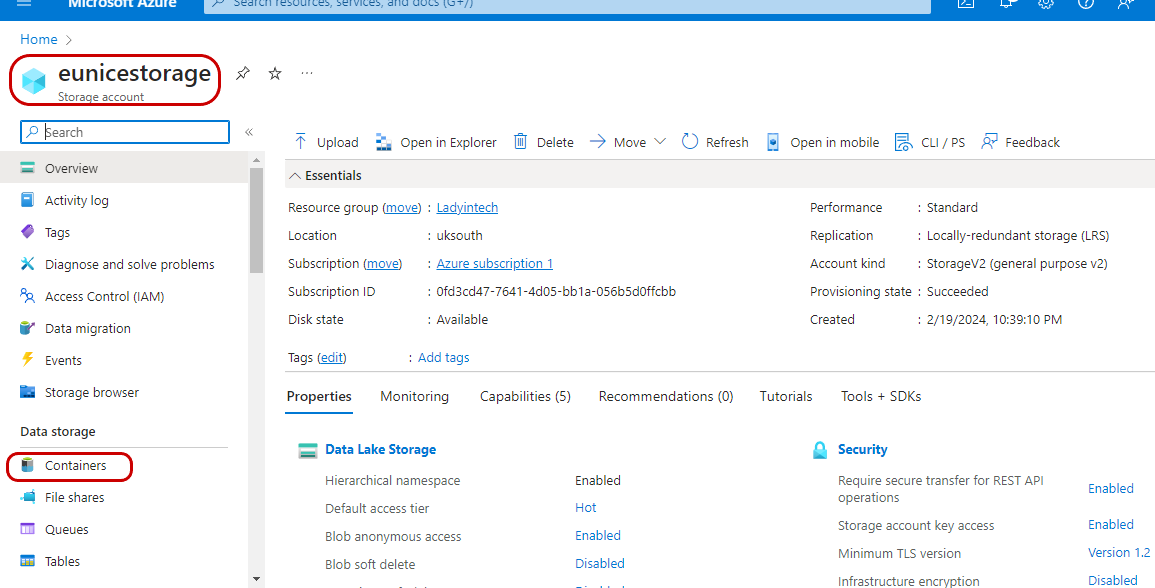
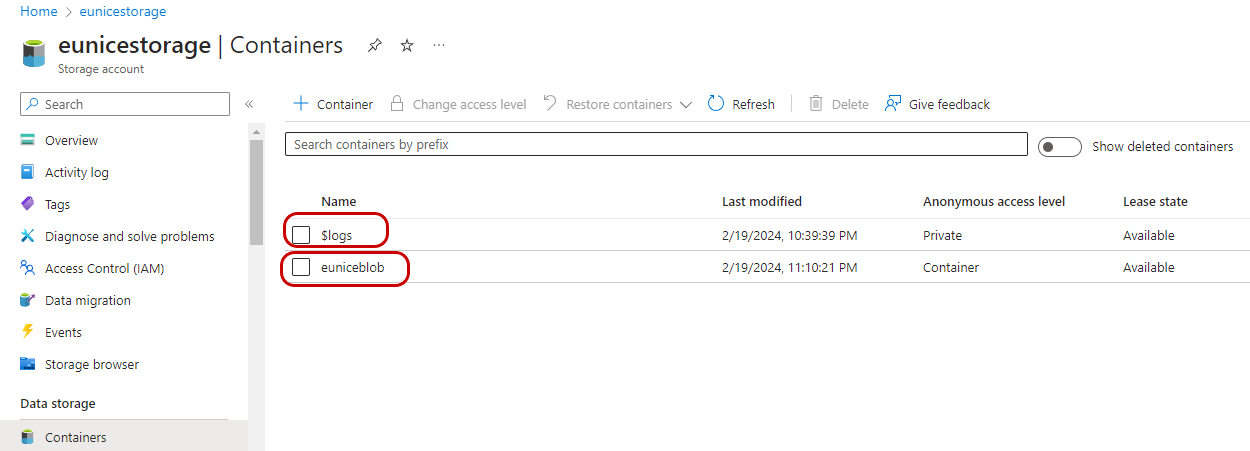
Step 3 - Navigate Storage: In the storage account menu, "Click on" "Containers" to access Blob Storage
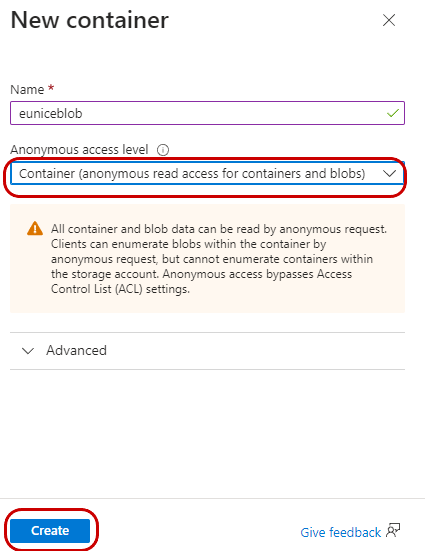
Step 4 . Create a container : "Click on" "Containers" in the left-hand menu button to create a new container. The page on the right would open "Create a name" Provide a unique name for the container. Choose the appropriate access level (Private, Blob, Container, or Blob only) depending on your requirements. on the drop down choose "Select" "Container read access"
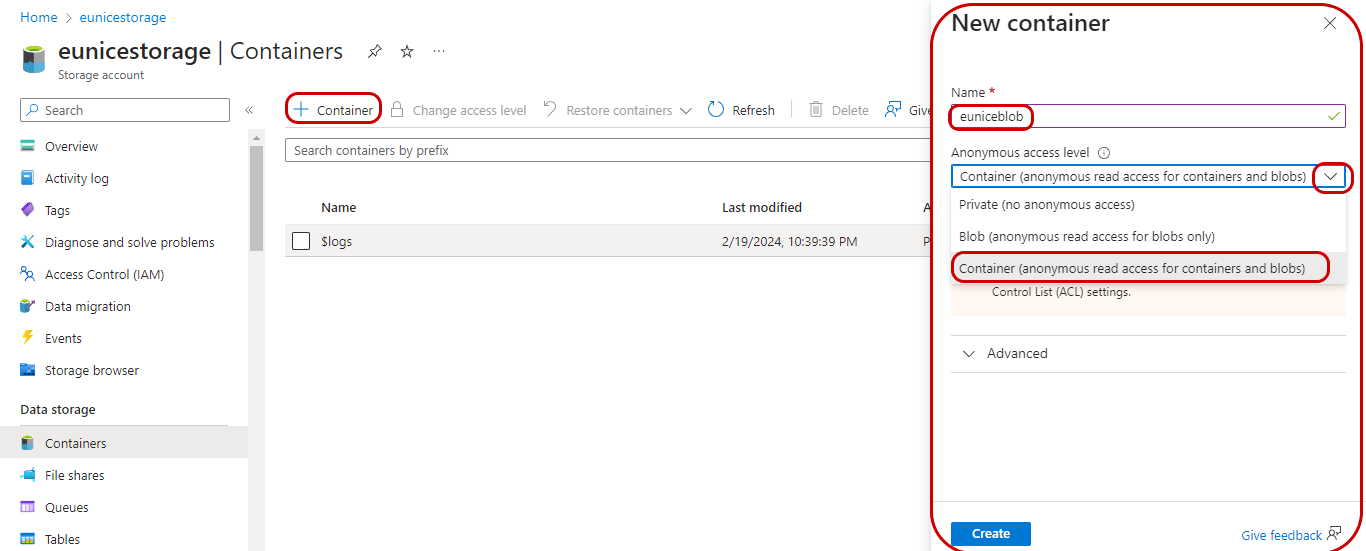
b. "Click on" "Create" to create the container
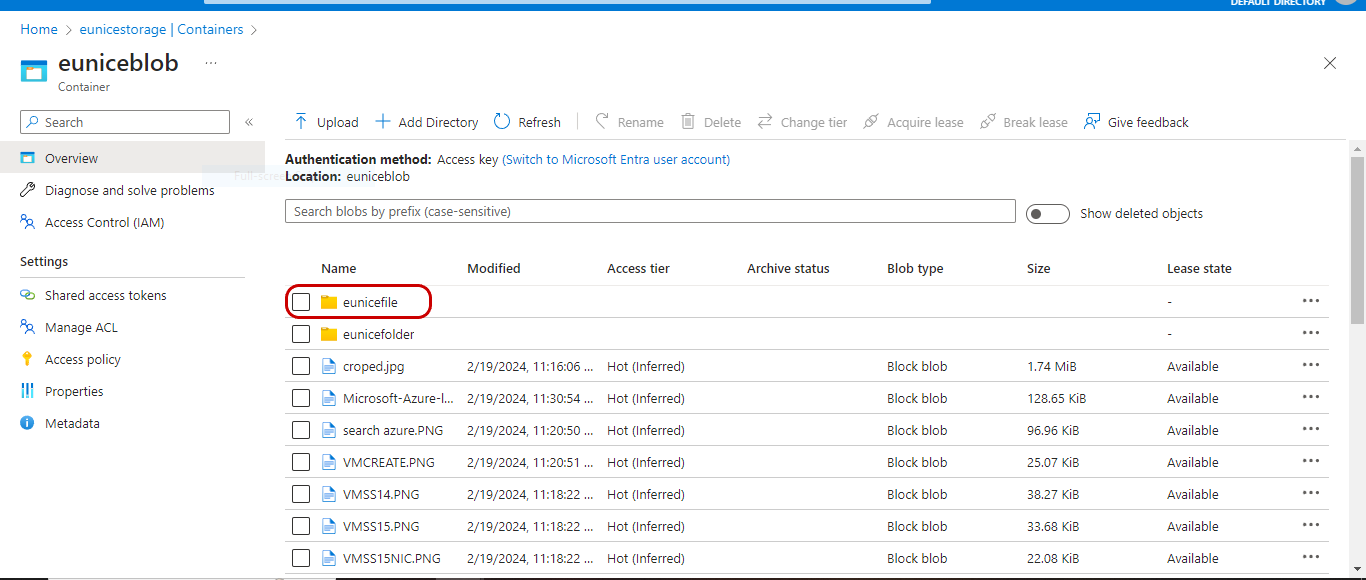
Step 5. Access your blob storage: Note: $logs container is a default blob storage created by Azure for support. The 2nd blob storage is the one we created click on it "Click on" "euniceblob"
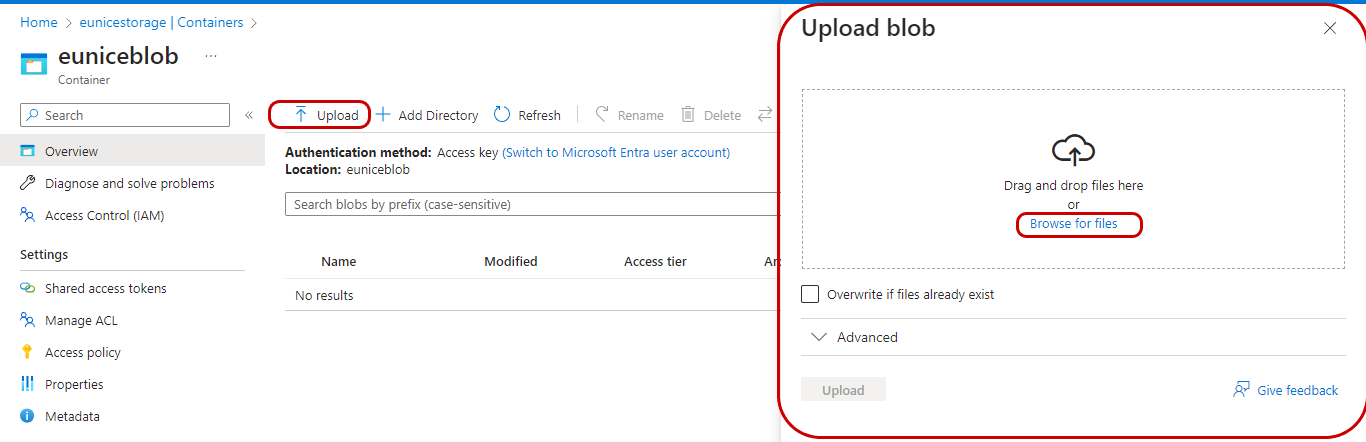
Step 6 - Upload files: you can start uploading, downloading, and managing your blobs (objects) within it. "Click on" "Upload" . The right page opens up "Click on""Browse files"
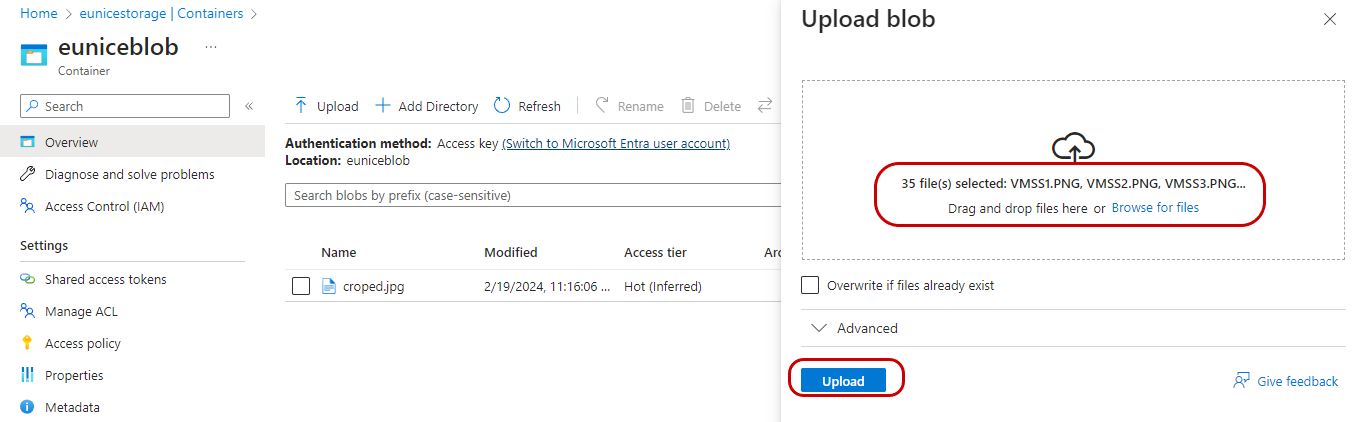
a. "Select" the "files" you want to upload from your local machine "Click on" "Open"

b. Initiate the upload process: Once completed, your files should appear in the container
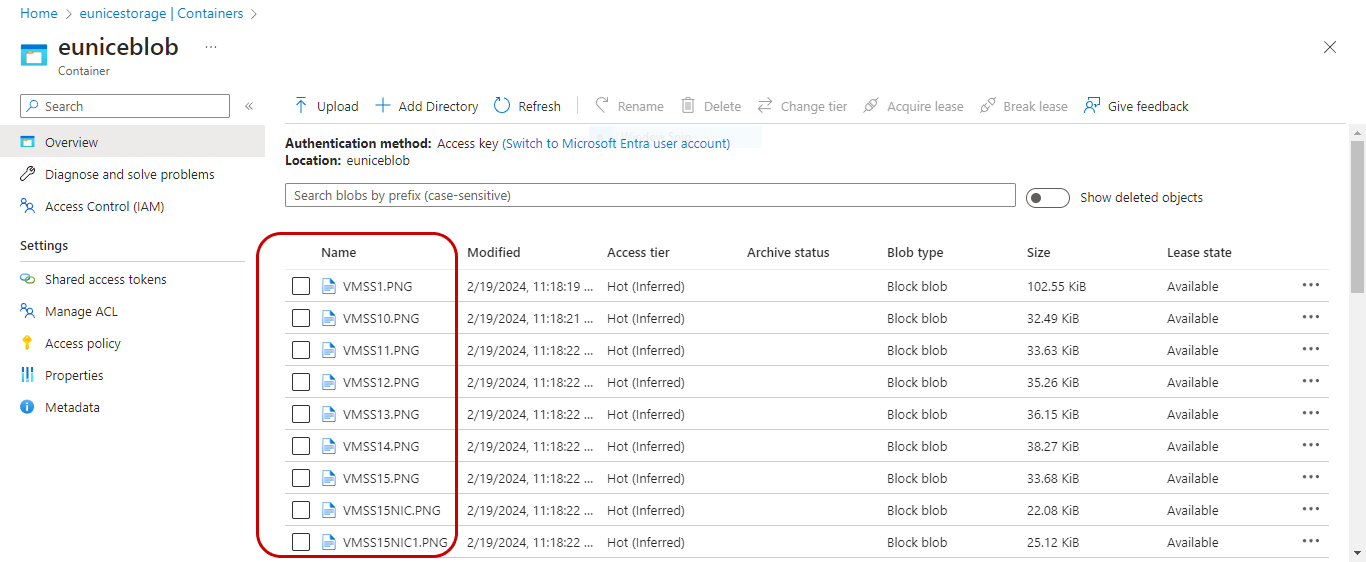
c. Files successfully uploaded
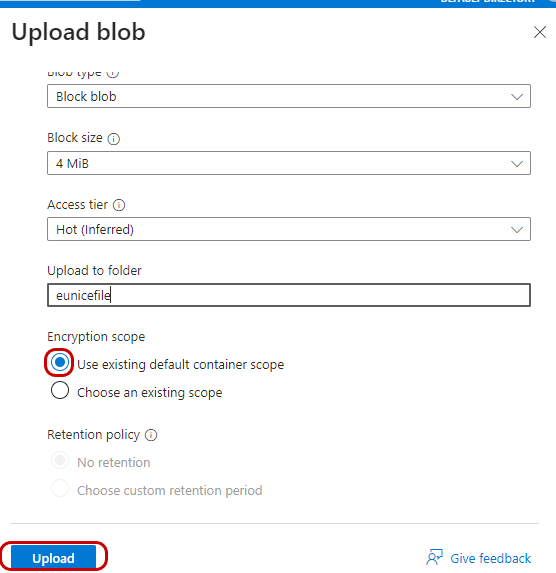
Step 7 . How to create a folder: "Click on" "Advanced" On "upload to folder" "Name your folder"

a. "check" "Existing default container" and "Click on" "Upload"
b. Folder is successfully created
Step 8 . Copy the URL from a file within a container for viewing on a web browser, you typically need to access the file within the container and then retrieve the URL from the file and I will show you how. "Click on" the "File" the right pane will open , copy the URL highlighted blue in a red box "Click on" the "blue box"
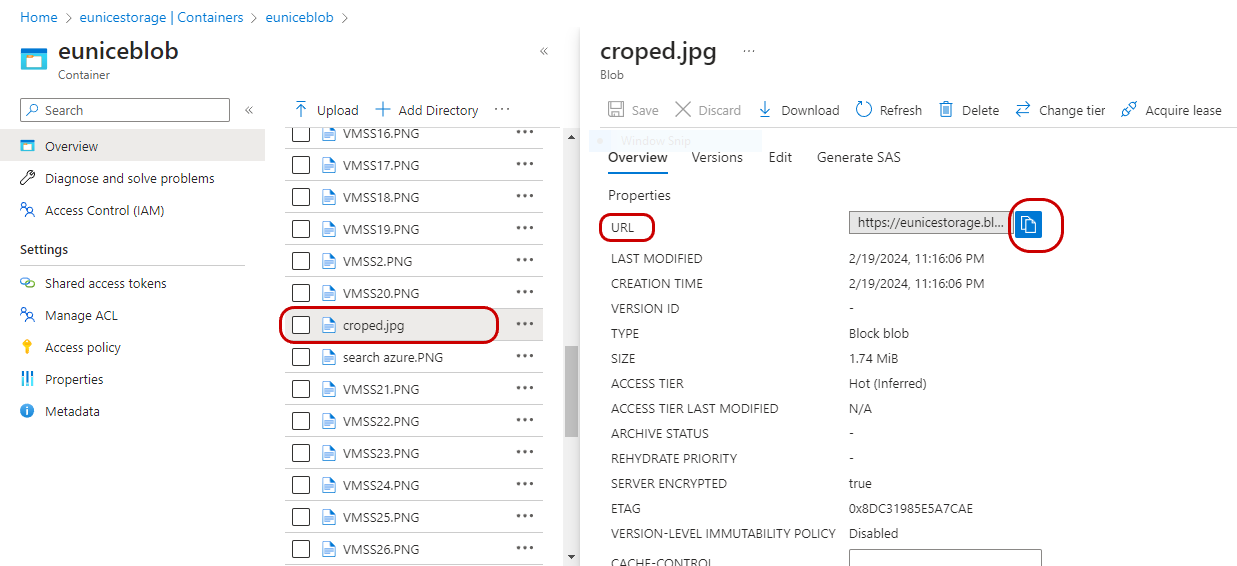
a. Paste the URL: You can now paste the URL into a web browser or any other application where you want to view it.

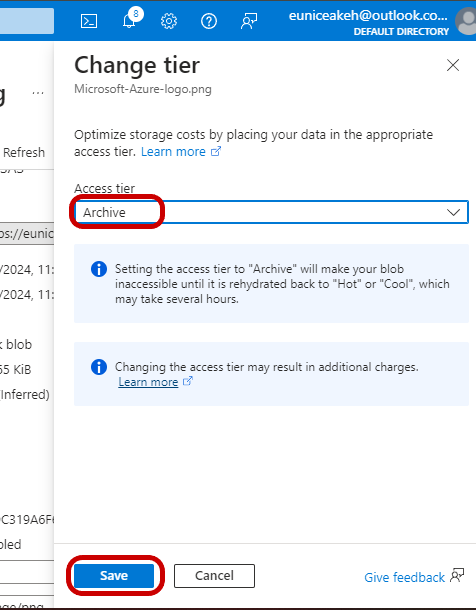
Step 9-Change Tier: In the world of cloud computing, storage management is a crucial aspect of optimizing costs and performance. Azure, Microsoft's cloud platform, offers a range of storage tiers to accommodate diverse needs and budget considerations. These tiers can be broadly categorized into hot, cool, cold, and archive tiers. "Click on " the "File" "Click on" "Change tier"
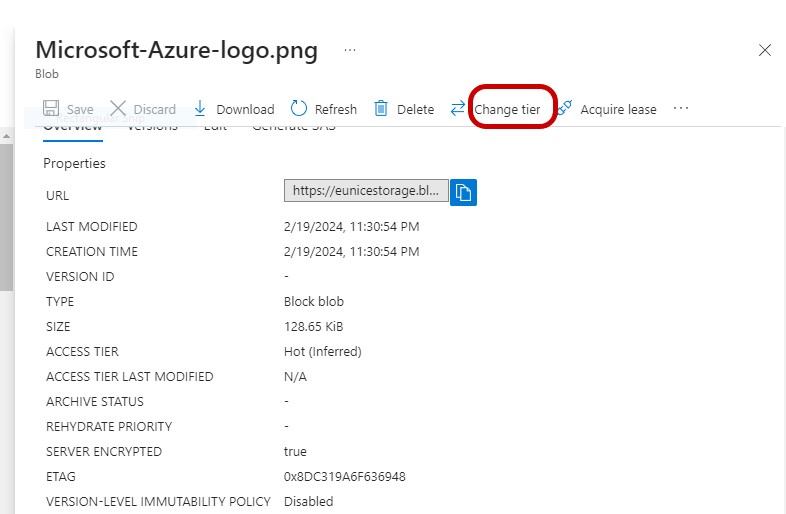
a. Hot Tier: The hot tier is designed for frequently accessed data that requires low-latency access times. It offers the highest storage costs but provides the fastest retrieval speeds. Cool Tier: The cool tier is suitable for data that is accessed less frequently but still requires relatively fast access times. It offers lower storage costs compared to the hot tier but may have slightly longer retrieval times. Cold Tier: The cold tier is intended for data that is rarely accessed and can tolerate longer retrieval times. It offers even lower storage costs compared to the cool tier but may have higher latency for accessing data. Archive Tier: The archive tier is the most cost-effective option for storing data that is rarely accessed and can tolerate the longest retrieval times. It offers the lowest storage costs but has the highest latency for accessing data, as it may take hours to retrieve archived data. Choose the tier that you want to change to
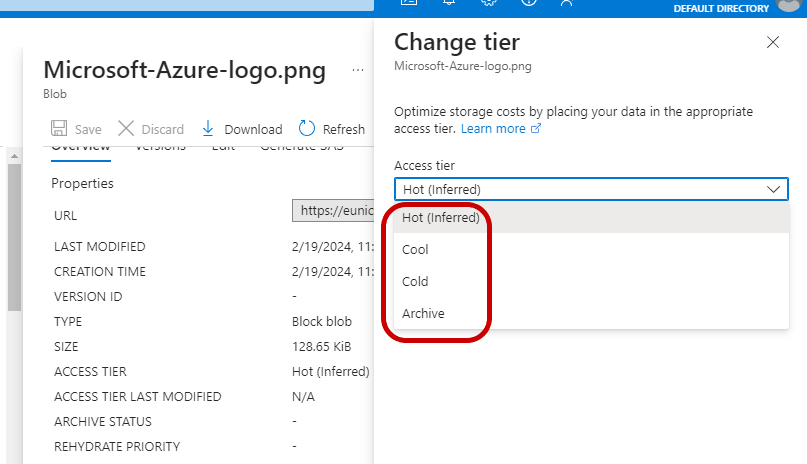
c. "Select Archive" and "Click Save"